
 Well, you asked for it, and here it is . . . the Ready Threader Tutorial. Not my own invention, but a great little idea, and quick to make. A good gift for a crafty friend or a nice accessory for yourself. Some have even told me you could carry your lipstick in it, in your hand bag, or even a couple of "white mice."
 Here's what you need to start
*Some light card for templates
*Small amount of fabric from your scap basket
*Small piece of wadding
*Tiny bit of felt
*3 buttons
*Some embroidery thread
. . . and you're ready to go!
1. Cut from light cardboard the templates as shown below.

2. From the 2 3/4 inch circle template, cut 2 circles of your chosen fabric 3. With the fabric on the fold, cut one of the 6 1/2 inch by 3 1/2 inch shapes
 For extra body, also cut one of these shapes from some wadding fabric that you just happen to have lying about in a box. I trim the wadding a bit thinner so that it fits snuggly inside and you don't need to cut the wadding on the fold.
 4. From the smallest circle template, cut 4 extra pieces from the light card. These will go inside the yo-yo's for extra strength.
 5. You will need to cut one shape out of felt, not on the fold this time.
 6. Choose some buttons and some thread
 7. Measure 4 inches of thread and knot at each end.
 8. Lay the thread on the right sides of the fabric with a little bit poking out the end and sew around the large shape, leaving a couple of inches for turning.
 9. Lay your wadding over the top of one side, and turn the main shape inside out, which will then be the right side out.

 10. Now you have your wadding on the inside, and you will need to hand sew the little gap that you left for turning.
 11. Press your main shape.
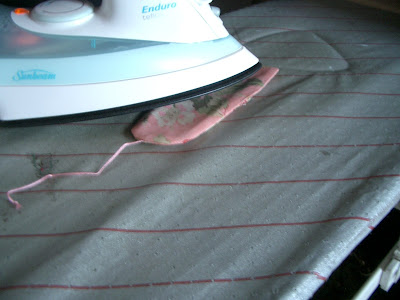 12. Now make your yo-yo's and insert the 2 little pieces of card into each of them.
 13. I left the long thread of the yo-yo for later stitching of the threader
 14. Now lay your felt over one side of the main piece and blanket stitch to that piece.
 15. Now with your yo-yo's facing inside, sew them to the edge of your main fabric.
 16. Once both yo-yo's are sewn on, turn the ready threader so that the buttons face outwards.
 17. Now put your cotton in place, and slide your needle into the felt, and you are finished!


3. With the fabric on the fold, cut one of the 6 1/2 inch by 3 1/2 inch shapesFor extra body, also cut one of these shapes from some wadding fabric that you just happen to have lying about in a box. I trim the wadding a bit thinner so that it fits snuggly inside and you don't need to cut the wadding on the fold.4. From the smallest circle template, cut 4 extra pieces from the light card. These will go inside the yo-yo's for extra strength.5. You will need to cut one shape out of felt, not on the fold this time.6. Choose some buttons and some thread7. Measure 4 inches of thread and knot at each end.8. Lay the thread on the right sides of the fabric with a little bit poking out the end and sew around the large shape, leaving a couple of inches for turning.9. Lay your wadding over the top of one side, and turn the main shape inside out, which will then be the right side out.10. Now you have your wadding on the inside, and you will need to hand sew the little gap that you left for turning.11. Press your main shape.12. Now make your yo-yo's and insert the 2 little pieces of card into each of them.13. I left the long thread of the yo-yo for later stitching of the threader 14. Now lay your felt over one side of the main piece and blanket stitch to that piece.15. Now with your yo-yo's facing inside, sew them to the edge of your main fabric.16. Once both yo-yo's are sewn on, turn the ready threader so that the buttons face outwards. 17. Now put your cotton in place, and slide your needle into the felt, and you are finished!

What a cute idea! I will have to try one of those.
ReplyDeleteLove your flowers, too!
~Elaine~
How funny! You were leaving me a comment at the same time I was leaving one for you....
ReplyDeleteGreat minds?
~Elaine~
Great tute Annie, you have made it look so easy!
ReplyDeleteThanks for sharing... my daughter is going off to college in the fall. I'm making her one for "dafe keeping"... Thanks again.
ReplyDeletethat is so cute! I love this idea. and your fabric is so pretty. thanks for sharing the tutorial.
ReplyDeleteWow that was quick - thanks for the tutorial.
ReplyDeleteWonderful tutorial. Thank you so much. I'm off to make one.
ReplyDeleteGreat tute, very cute....you can tell you have been on hols!!!
ReplyDeleteThe photos down the sidebar all look great, Tracey
What a great idea! I could use this sort of 'organisation' otherwise my thread and needles get tucked into a project = lost!
ReplyDeleteYou've written a great tutorial.
thanks
Carolyn
Thanks so much for sharing. I have ear marked this one for later.
ReplyDeleteI love your new photos all over your page too. Looks great.
Hugs Fiona
Great tutorial Annie! And I've just noticed those two gorgeous photos at the bottom of your page - love them!
ReplyDeleteVery cute! Good idea for the mothers day stall too ..
ReplyDeleteFantastic tutorial Annie - thanks for sharing :)
ReplyDeletexx
What a terrific idea - I will crtainly have to whip up one of these. Thanks for sharing :)
ReplyDeleteYou are very good at explaining step by step how to make this cute little ready threader-well done!!!
ReplyDeletegreat looking sewing accessory. You did a great job on the tutorial.
ReplyDeleteThankyou for sharing...sure will try to make one...just have to ...it was so cute...;D
ReplyDeletehow fabulous! thanks for sharing!!!!!! Might have to try that as makes a lovely pressie for a sewer or crafter!
ReplyDeleteCorrie:)
really good tuorial annie, all the pictures are great!
ReplyDelete; )
Thanks for the tutorial, i made one of these at a morning tea a few years ago and i have found it invaluable!
ReplyDeleteWhat a great little invention!!! You're tutorial is perfect Annie and I can't wait to give it a go.. Well Done ;)
ReplyDeleteJodie
Oh I love this idea!!! Thanks for the great tutorial!!
ReplyDeletemmmtextile teaching i see..it would take me a month to do that but it is very cute..still cant get over the shock of the quilt
ReplyDeletehey added this to my things to make list....looks like a great tut......well done.....
ReplyDeleteCiao
ReplyDeletegrazie bello il progetto
Laura
Hi I just found you from Amitie ... now this is a very useful little cool thing! I can't wait to make one ! Thank you soooo much!
ReplyDeleteHola Excelente tutorial, ya lo hice y me encanto muchas gracias.
ReplyDeleteOdette
I love this - thanks for a brilliant tutorial!
ReplyDeleteWhat a fabulous idea -- I am definitely going to try this!
ReplyDeleteI just found your blog and love it.
This comment has been removed by the author.
ReplyDeleteWe made a sewing caddy almost identical to that as our first sewing project at high school in UK.
ReplyDeleteThank you for reminding me of it!
Ros
:o)
Nice idea and well laid out and easy to follow.
ReplyDeletethread holder is just precious I will post it on my blog Thanks Debbie http://somewhereinstitches.blogspot.com
ReplyDeleteque original!!!!1
ReplyDeletemuchas gracias por el tuto.
saludos desde España
I will have to try this, such a cute little gift to make,
ReplyDeleteGreat tutorial!
ReplyDeleteI thought this was lovely so made my own for my on the go sewing bag (I added some Velcro to the back to stick it down when travelling.) http://imgur.com/oUJYXs.jpg if you want to have a peek :)
ReplyDeleteThanks for the tutorial!
What a wonderful idea. Thank you so much for you tutorial.
ReplyDeleteI love your blog.
Heike
Hi Annie, Funny how I ended up here! I was on the wicked blog hop. Went to one of the blogs, then linked to a blog they were following then linked to the pattern for the cute thread or thimble holder and here I am. I want to make one out of some Japanese fabric that I have. Thanks for the pattern and tutorial.
ReplyDeletewhat a Great idea.I love your blog.For more information about attorney general website and Website for 500, do check out my friend's website Website for 500. There's lots of useful information and he offers a complimentary service too!
ReplyDeleteNice idea :D made one myself :D
ReplyDeletehttp://audroniukas.deviantart.com/art/Portable-case-for-thread-and-needle-477572712?ga_submit_new=10%253A1408807340
Cute! This is such a nice gift for my granny! Thanks for sharing! =)
ReplyDeleteThey ARE so pretty, and you've captured their beauty perfectly in that early morning light. stallion group nigeria
ReplyDeleteHaresh vaswani
Mahesh vaswani
Sunil vaswani
Vaswani brothers
Cute little project. Found this via pinterest. I will definitely have to make me one. It'll save me from loosing my needle in the arm of my chair and keep my thread with it.
ReplyDeleteJudi Online
ReplyDeleteJudi Bola
Slot Online
Idnplay
You’re so interesting! I don’t believe I’ve truly read something like this before. So great to find someone with genuine thoughts on this issue. Really.. many thanks for starting this up. This website is something that’s needed on the internet, someone with some originality!
ReplyDeleteCBSE Schools In Udupi
CBSE Schools In Uttar Kannada
CBSE Schools In Yadgir
CBSE Schools In Ballari
CBSE Schools In Bagalkot
CBSE Schools In Belagavi
CBSE Schools In Amreli
CBSE Schools In Anand
CBSE Schools In Banaskantha
CBSE Schools In Baroda
I made one of these little cotton and needle cases when I first started quilting back at Woodpatch Quilters in SA. The senior ladies instructed me and another new quilter. I still occasionally use it today when I want to hand quilt. So practical and cute. Thankyou for inspiring us today.
ReplyDeleteBonjour!!
ReplyDeleteMerci pour ce sympathique tuto mais j'ai un " problème" avec les mesures....
Serai t'il possible de les avoir en centimètres??? Merci d'avance pour ce partage...
Patricia de la Basse Normandie...
I’ve made about 10 so far as gifts. I now have 2 for me! I use it a lot! Great for quilters or any sewer or even just for repairs.
ReplyDelete