Well, you asked for it, and here it is . . . the
Ready Threader Tutorial. Not my own invention, but a great little idea, and quick to make. A good gift for a crafty friend or a nice accessory for yourself. Some have even told me you could carry your lipstick in it, in your hand bag, or even a couple of "white mice."
Here's what you need to start
*Some light card for templates
*Small amount of fabric from your scap basket
*Small piece of wadding
*Tiny bit of felt
*3 buttons
*Some embroidery thread
. . . and you're ready to go!
1. Cut from light cardboard the templates as shown below.

2. From the 2 3/4 inch circle template, cut 2 circles of your chosen fabric 3. With the fabric on the fold, cut one of the 6 1/2 inch by 3 1/2 inch shapes
 For extra body, also cut one of these shapes from some wadding fabric that you just happen to have lying about in a box. I trim the wadding a bit thinner so that it fits snuggly inside and you don't need to cut the wadding on the fold.
 4. From the smallest circle template, cut 4 extra pieces from the light card. These will go inside the yo-yo's for extra strength.
 5. You will need to cut one shape out of felt, not on the fold this time.
 6. Choose some buttons and some thread
 7. Measure 4 inches of thread and knot at each end.
 8. Lay the thread on the right sides of the fabric with a little bit poking out the end and sew around the large shape, leaving a couple of inches for turning.
 9. Lay your wadding over the top of one side, and turn the main shape inside out, which will then be the right side out.

 10. Now you have your wadding on the inside, and you will need to hand sew the little gap that you left for turning.
 11. Press your main shape.
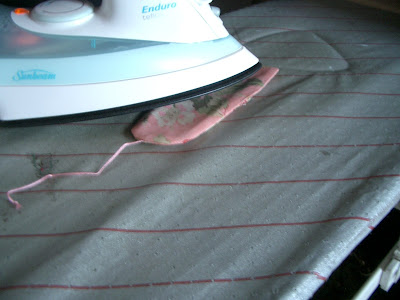 12. Now make your yo-yo's and insert the 2 little pieces of card into each of them.
 13. I left the long thread of the yo-yo for later stitching of the threader
 14. Now lay your felt over one side of the main piece and blanket stitch to that piece.
 15. Now with your yo-yo's facing inside, sew them to the edge of your main fabric.
 16. Once both yo-yo's are sewn on, turn the ready threader so that the buttons face outwards.
 17. Now put your cotton in place, and slide your needle into the felt, and you are finished!


 I'm feeling a little snowed under at the moment. Just the world taking over and too much to do. Kids busy with activities, full time work, and lots of mundane chores to complete.
 I like to escape to my garden and get lost in the little things that I see out there.
 One foot in front of the other . . .
 . . . and the days go by


 Ribbons were on special at Lincraft last week, so I couldn't help buying some